Viewing and Updating Instances
| PERMISSIONS REQUIRED |
| To view and update instances, you need to have administrator access to the relevant cluster. To get access, contact your Nimbul administrator. See also Permissions and Roles and Clusters and Servers: Overview. |
Topics covered on this page:
Viewing Instances
Updating Instances
Viewing Instances
To get details about a currently running instance, complete these steps:
- View a list of running instances using one of the following methods:
Provider account administrators only:
- In the main Nimbul menu, click Provider Accounts.
- Click the name of the provider account that contains the instances you want to view. A provider account summary page appears, with the Instances tab displayed.
OR (All users with cluster access):
- In the main Nimbul menu, click Clusters. A cluster summary page appears, showing the current instances and servers in each of the clusters to which you have access (grouped by provider account).
- Click the name of the cluster that contains the instances you want to view. The cluster details page appears, with the Instances tab displayed.
You can also click the Servers tab and use the show links in the Instances column.
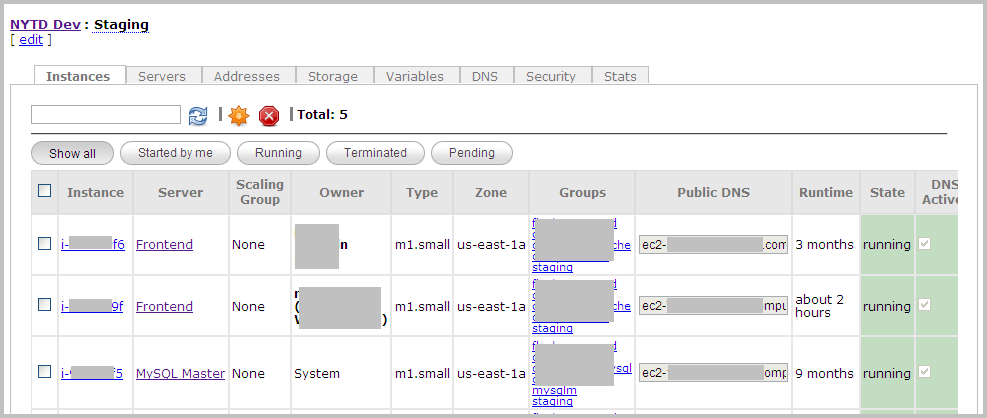
| Column | Description |
| Instance | The instance ID, as assigned by the cloud provider account. Click the ID to update the instance and see more details (described further below). |
|---|---|
| Server | The server name. To view the server profile, click the link in this column. |
| Scaling Group | The auto-scaling group for the instance, as defined on the Auto-Scaling tab for the provider account or the Launch Configurations tab for the server. |
| Owner | The Nimbul user who launched this instance. |
| Type | The instance type, as described by the cloud provider account. For example, an EC2 instance might be type c1.medium, or high-CPU medium. |
| Zone | The instance’s network location, as assigned by the cloud provider account. |
| Groups | The Nimbul security groups that control access to this instance. To see the firewall rules for a security group, click the name of the group in this column. |
| Public DNS | The external DNS name that resolves to the public IP address assigned to the instance. |
| Runtime | The total time this instance has been running. |
| State | The instance’s current state — see the next table. |
| DNS Active? | Indicates whether hostname leases can be assigned to this instance. If you selected Skip DNS when you started the instance or have manually disabled hostname leasing, DNS will not be active. For more information, see Hostnames. |
| Ready? | Indicates whether bootstrapping and all startup scripts have been completed (an instance can be “running” without being “ready”; see Instance States). |
| Locked? | Indicates that the instance cannot be terminated or rebooted. To unlock the instance, see Updating an Instance. Note: you can lock instances running under a particular server by using the Security tab for the server. See Managing Servers. |
| Click the console icon to view the console output for this instance. |
The State column will show one of the following:
| State | Description |
| requested | The instance has been requested from the cloud provider, but the provider has not reported any further state information. |
|---|---|
| pending | The cloud provider is aware of the requested instance. The instance may or may not have begun booting. |
| running | A running instance may be “ready” or “not ready”:
|
| shutting_down | The instance is currently shutting down but has not yet been fully terminated. |
| terminated | The instance has been terminated. Console output is available (click the console icon on the far right). Terminated instances remain on the Servers tab for approximately five to ten minutes. |
- To view more details, click an instance ID. Additional instance metadata is described in the next section.
Updating Instances
- Open an instance details page by completing steps 1–3 above or by clicking an instance ID anywhere you find it in the system.
- Edit the appropriate fields to change the instance settings (changes become effective immediately):
Note: Only editable fields are listed in this table. For information about other fields, see the metadata table above.
| Field | Description |
| General Information | |
| Locked | Select or clear this checkbox to lock or unlock the instance. Locked instances cannot be stopped or rebooted. |
|---|---|
| DNS Active? | Select or clear this checkbox to acquire or drop hostname leases. If the checkbox is currently selected, clearing it will cause all hostname leases to be dropped. (This will occur instantly.) |
| Actions | If available, use the icons in the Actions column to reboot the instance, terminate the instance or view console output. For more information, see Launching and Terminating Instances. |
| Security Groups | Click a group name to manage its firewall rules (if you have the necessary permissions). For more information, see Setting Up Firewall Rules. |
| DNS | |
| Assigned Leases | If this instance currently has hostname leases assigned to it, a yellow arrow icon will appear next to each lease. Click this icon to relinquish the lease. |
| Unassigned Hostnames | If any hostnames are available for leasing to this instance, a green arrow icon will appear next to each lease. Click this icon to acquire a lease. |
| Address | |
| Actions | Click add to attach an available IP address to this instance. A drop-down list will appear. Select the address you want to add, then click the Add button. If an address has already been attached to this instance, the Actions column contains a yellow arrow icon for detaching the address. |
| Force Allocation | Select this checkbox to attach an IP address that is currently in use. (It will be detached from the other instance that is currently using it.) |
| Storage | |
| Volume | To attach a volume to this instance, click add. Specify a Mount Point, then click the Add button. Click the green arrow icon in the Actions column to attach the volume. If a volume has already been attached to this instance, the Actions column contains a yellow arrow icon for detaching the volume. |
| Force Allocation | Select this checkbox to attach a volume that is currently in use. (It will be detached from the other instance that is currently using it.) |
Related Topics
End of section. Next section: Hostnames and Addresses »